The initial footprinting gives us much to work on, below we see the result of nmap-scan with version detection on:

The unrecognized service on port 7777 is not any I've encountered before and it just seems to return the string it receives:

Next I moved forward to the website. The front page only has a link to the blog, so I check it out:

On the blog, there is a link to make a new post, the URI is /admin/post.php. I then checked what the /admin -folder looks like, and we have directory listing enabled:

Next I run dirb against the site with the common.txt wordlist, which comes with it and we find 2 more folders: /profiles and /repo:

The folder /profiles holds a txt-file which obviously is the signature of the blogger. The /repo folder holds a single c source code file called buffd.c
When I start to test the functionality of the php-scripts, I see that both the profile.php and post.php require username and password to update the profile or to create a new post. Both scripts have an SQL Injection vulnerability in the password field.
Each blog post has a signature in it. The signature is loaded from the profiles folder and naturally when we update the signature of the blogger, the signature is updated. The signature is in the format blogger-sig.txt. When I view the page source of the profile.php-page, I notice a hidden field which holds the value "sig.txt". Perhaps we can create a php shell, if we change the extension. So let's try it:

The password is just a simple SQL Injection: ' or 1=1 -- -
After I submit the form, I get a confirmation:
OK, then we check the profiles folder and we see a new file admin-shell.php, and sure enough, it is working:

To get a more comfortable shell, I then create a reverse shell payload with msfvenom, upload it to the target (or rather download it from our box with the webshell), remember to set the executable flag and run it, and sure enough, we get a shell.
I then create a pseudo tty with python and change some settings with stty to gain tab completition and to be able to use interactive applications:

When enumerating the server from the inside, we see that root is running a program called buffd, which probably is compiled from the source code we found from the /repo-folder. We see the relevat extract of the output of command ps -ef:
I then decided to check if database holds any more secrets, so I grabbed the password from the php files:

Root? With root user we would've had the FILE-permissions, so we could've used the SQL injection to create the php shell... Ok, that's too late now. Let's just see what the db holds:

Only the blog database? What's in it:

Nothing interesting... I tested the password for both root and testuser, but it didn't work on either.
In this point I tried a few kernel exploits, but had no luck with them, so I returned to investigate the buffd-program a bit more.
So I copied the buffd-executable under the webroot and downloaded it and the source code to my own box. The source code has a function with a curious name "vulnerable":

And sure enough: the function is actually vulnerable to buffer overflow. The content is originally read from the socket connection and directly passed to this function. When the content of the net_buffer is longer than 120 bytes, we get a buffer overflow. I create a simple python file for testing the app and run it with a debugger. In this point the python code looks like:
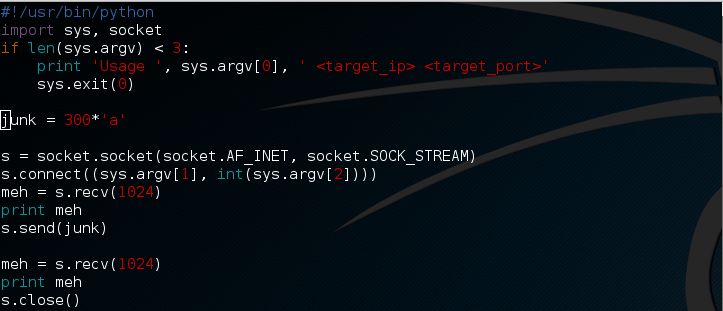
In brief, we create a string of 300 a's, open a socket to IP and port defined on the command line, red the "HELO\nCOMMAND:" prompt and then send the string to the server. When we observe the action in debugger, we can see that the EIP is overwritten. Because the application forks a new process for each new connection I have to set the follow-fork-mode:

So EIP was overwritten with a's (61 is the ASCII a in hex). To determine the exact offset of the return address I create a cyclic pattern and send it instead of a's:

When the pattern is sent to the service, I observe the following crash:

Then check the offset with pattern_offset.rb and it's 124 bytes:
Then I updated the payload to hold 124 a's, followed by 4 b's and then 172 c's to see how it is positioned in memory and if we have some registers pointing to key points... After I send the string I can confirm that the b's overwrite the EIP:

and that ESP points to the beginning of the c's

Because the ESP points to the beginning of the c's we could try to find a JMP ESP (or equivalent) opcodes from the application or the libraries it uses. If we find such a place, we will replace the b's with that address.
Now we know that one way to exploit this program is to send a string of 300 bytes to it with the following structure:
124 bytes of junk, 4 bytes jump address, the payload (up to 172 bytes) and finally padding to make the string 300 bytes long (could work with other lengths too, but this we know to work).
I then start to look for \xFF \xE4, which is the opcode for JMP ESP (you can check it with nasm_shell or just google it... ). If it's not found, we could look for other opcodes with the same effect, such as CALL ESP (\xFF \xD4) and so on.
We find many occurrences of the opcode in the .eh_frame_hdr in libc.so.6. First a small extract of the info target (in gdb):

Then finding wanted the opcodes from that memory range:

The list goes on and on. We can confirm that these addresses contain the opcodes with gdb, just remember the little endianness:
I then move back to the target box. I run gdb and set the breakpoint to the beginning of the main function, because I can't run the whole thing, for the port 7777 is already in use:

Now the libraries are loaded in the memory and I can examine the addresses. I then run the info target to find the equivalent memory range where I found the needed opcodes on my box:

I then start to investigate that memory range:

Finding the needle in the haystack:

It can be hard to see in the above screenshot, but with a different offset (just shifting it with 2 bytes):
And the exact address:
That's 1 more piece of the puzzle! Now we just need the shellcode and luckily we have such good tools as msfvenom:

Because msfvenom uses the shikata ga nai encoder by default I add 8 bytes of nops (\x90) to the beginning of the shellcode, otherwise part of the shellcode would be overwritten when decoding the shellcode.
We now have all the pieces, and when we complete the puzzle, the final attack script looks like this:

When I set up a nc listener and run the script I get a root shell:

BOOM! Headshot!
In conclusion:
The VulnImage: 1 is a good place to go, if you don't have much experience about exploit development, because the modern memory protection schemes (ASLR, Canarys etc) are not in place.
Huge thanks to g0tmi1k for hosting vulnhub.com and to Lars Baumgaertner for a fun vulnerable box!


